FocusTube pt. 1
In this project you will learn the basics of NextJS to start building a YouTube wrapper that will help you focus and not stay distracted
About the project
Welcome to the FocusTube tutorial! Through this project, you will learn the fundamentals of making your own API, calling APIs, and the additional features NextJS has over React.
What you will learn in this Series:
- How to use and create the fundamental parts of an API (endpoints, requests and responses) in NextJS
- How to connect, fetch, parse, and display API data from YouTube
- The fundamentals of NextJS (Server Side Rendering vs Client Side, Dynamic Routing, Loading States, Routing)
- OPTIONAL: Learn how to use TailwindCSS
What you will make:
By the end of this series, you will have a basic full-stack YouTube wrapper that allows you to use YouTube through your own design, such as removing YouTube’s distracting features.
Further Possibilities:
There are many avenues you can take with this project. While it will be fully functional by the end of this tutorial, there are plenty of opportunities to add your own features and make this project your own. I will go more in depth on these possibilities later in the tutorial.
Disclaimer
This series assumes a couple of things:
- You have decent knowledge of JavaScript
- You have basic knowledge of React
- You already have the necessary tools installed (Node.js, an IDE like VS Code)
Setup the project
You will be making your own project instead of forking a repository. Making a NextJS app is incredibly easy.
Open a terminal. In the terminal, go to the folder you want your NextJS project to be in, then run this command:
1
$ npx create-next-app@latest
You will be given multiple prompts on how you want your project to be. Below are our supported settings for the tutorial.
1
2
3
4
5
6
7
8
✔ What is your project named? … my-app
✔ Would you like to use TypeScript? … No
✔ Which linter would you like to use? » ESLint
✔ Would you like to use Tailwind CSS? … Yes
✔ Would you like your code inside a `src/` directory? … Yes
✔ Would you like to use App Router? (recommended) … Yes
√ Would you like to customize the import alias (`@/*` by default)? ... No
√ Would you like to include AGENTS.md to guide coding agents to write up-to-date Next.js code? ... Yes
QUESTION: While we’ve provided the recommended setup options for this tutorial, it’s highly encouraged to know what they actually do! Take a moment to research: What exactly is ESLint? What is the difference between the Next.js
App Routerand the olderPages Router?
Now you will now have a folder for your project. I named mine /my-app, as seen above. cd into that folder and run:
1
$ npm run dev
This will start up your app and you will can visit it here at localhost:3000
NOTE: When you change your project, this will automatically update the website for you. There is no need to keep terminating and restarting the program.
Now you are ready to start the tutorial!
Take a look at your file tree. It should look something like this:
1
2
3
4
5
6
7
8
9
10
11
12
13
14
15
16
17
my-app/
├── node_modules/
├── public/
├── src/
│   └── app/
│       ├── favicon.ico
│       ├── globals.css
│       ├── layout.js
│       └── page.js
├── .gitignore
├── eslint.config.mjs
├── jsconfig.json
├── next.config.mjs
├── package-lock.json
├── package.json
├── postcss.config.js
└── README.md
Feel free to check out page.js in your app folder, this is the home webpage in your NextJS app, which is a good transition into the first topic.
QUESTION: There are some new files in our project. What are
.gitignore,node_modules, andpackage.jsonfor? What happens when you deletepackage-lock.json?
File-Based Routing
File-Based Routing means that the structure of your files and folders inside the app/ directory automatically defines the routes in your web app.
Let’s take a look at what this really means.
In your /app folder create a folder called /video. In this folder create a file called page.js. In this file, put something really simple like this:
1
2
3
export default function Video() {
   return (<h1> This is the Video page! </h1>);
}
Next, go to http://localhost:3000/video
Here, you will find the component you just wrote. This because of the File-Based Routing in NextJS; since you made a folder in your /app directory and gave it a page.js, the web app now treats this as a route. In other words, any folder in the /app directory will become a path in your web app (as long as you have a page.js file inside).
QUESTION: What is a component? They are key to truly mastering the power of react, so learn a high level definition to keep in the back of your mind since this term will come up again and again.
For more information, please feel free to use the NextJS Documentation.
Adding more Routes
Now that we know what file-based routing is, make 2 more routes.
/search/playlist
For now, these can display whatever you like.
Here is what your file tree should look like now:
1
2
3
4
5
6
7
8
9
10
11
12
13
14
15
16
17
18
19
20
21
22
23
my-app/
├── node_modules/
├── public/
├── src/
│   └── app/
│       ├── favicon.ico
│       ├── globals.css
│       ├── layout.js
│       ├── page.js
│       ├── playlist/
│       │   └── page.js
│       ├── search/
│       │   └── page.js
│       └── video/
│           └── page.js
├── .gitignore
├── eslint.config.mjs
├── jsconfig.json
├── next.config.mjs
├── package-lock.json
├── package.json
├── postcss.config.js
└── README.md
You should have 4 routes in your website: the homepage, /search page, /playlist page, and the /video page.
Now that we have a couple routes, we can start to change how they look. Feel free to use the instructions as a guide to your own design, or copy it if you already feel comfortable in React and JS.
Video Route
It is pretty easy to add youtube videos into you web app even without any API. On most youtube videos, you can click the Share button, and you will see an option called Embed, which will give you an <iframe> component that you can add to your project.
Feel free to chose any video and put it in your /video route
1
2
3
4
5
6
7
8
9
10
11
12
13
14
export default function Content() {

 return (
   <div>
     <iframe
       width="960"
       height="540"
       src={`https://www.youtube.com/embed/your-youtube-video-id-here`}
       title="YouTube video player"
       allowfullscreen
     ></iframe>
   </div>
 );
}
BUG: In the above answer I purposely mistyped one of the attributes of
<iframe>.
Luckily, when you save the file and look at it at the /video web app route, you will see a NextJS logo that says issue on the bottom left.
If you click this logo, it will tell you any errors or warnings you may currently have in your file. This will be a massive help while you are programming. However, it won’t catch everything, such as bugs! Bugs may not be an error; they just don’t do what you intended them to do.
When this happens, make sure you always use Fn+F12, which lets you inspect your webpage HTML and CSS. Additionally, if you are stuck or unsure what is going on, you can always use various console functions like console.log(), which is the equivalent to print() in javascript. I will add areas for you to try these out later.
Search Route
Next up, we have our /search route.
NOTE: This may sound counter-intuitive, but the search page will display the search results, not the actual search bar. The search bar will be added on the home page, which we will get to shortly.
First, let’s create a basic page component that just returns a title.
1
2
3
4
5
6
7
8
export default function SearchPage() {
 return (
   <div>
     <h1>Search Results</h1>
     {/* Video cards will go here */}
   </div>
 );
}
QUESTION: This is the second component we have seen. You may start to pickup a pattern on how they are constructed. What do these component functions return?
Next, we need a way to mock a single “Video Card”. A video card should have a thumbnail image, a title, and a description. We also want the entire card to be clickable so it can take the user to the /video route we just made! A perfect job for a <Link> component.
Let’s import <Link> and add a dummy video card below our title:
1
2
3
4
5
6
7
8
9
10
11
12
13
14
15
16
17
18
19
20
21
22
23
import Link from 'next/link';

export default function SearchPage() {
 return (
   <div>
     <h1>Search Results</h1>
     <div>
       <Link href="/video">
         <img
           src="https://i.ytimg.com/vi/abc123/mqdefault.jpg"
           alt="How to Learn JavaScript Fast"
           width={160}
           height={120}
         />
         <div>
           <h2>How to Learn JavaScript Fast</h2>
           <p>A quick guide to getting started with JavaScript.</p>
         </div>
       </Link>
     </div>
   </div>
 );
}
Wait, what is a <Link> component? We defined a ‘component’ above. It is just that. Just prebuilt for you by React. Using this prebuilt component gives us another really cool ability…
QUESTION: Why do we import the
<Link>component instead of just using a standard<a>tag? What happens in the browser if you use a standard<a>tag?
You can copy and paste the <Link> block multiple times if you want to see what a list of results looks like. Later in the tutorial, we will replace this hardcoded fake data with real API calls!
Playlist Route
TASK: Make the playlist route. It is very similar to the search route. You got this!
- Inside
/playlist/page.js, create a React component that shows fake video cards/items in a playlist - Style each video as you want
- Make sure each one links to the
/videoroute
Main and Layout Pages
Main Page
Our main page will also be relatively simple. There are just a couple things to implement, all of which you should be able to do on your own. Working code will be included below, but make sure to attempt it yourself first.
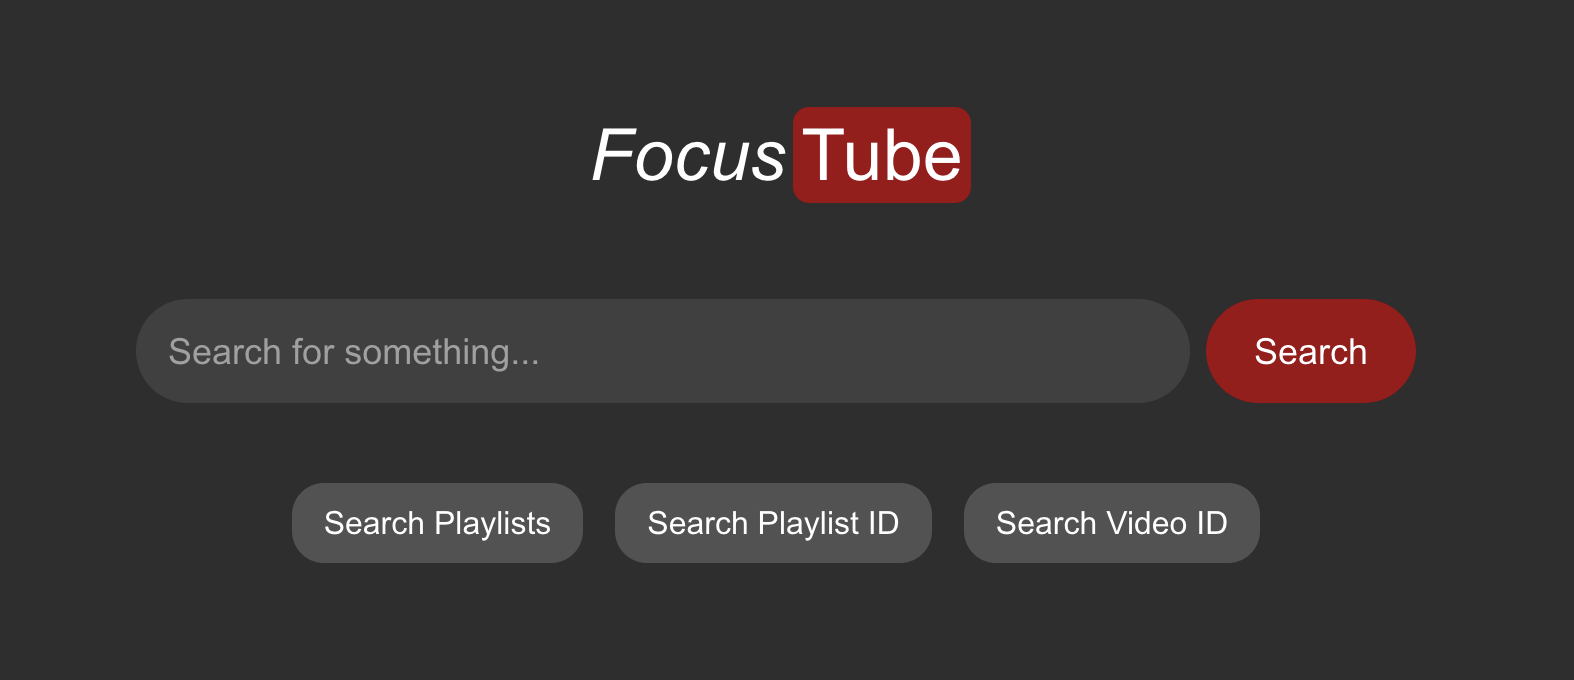
What the main page should look like:
- A search bar, in which you can type anything
- Searching should not be possible when the input is blank
- 4 different buttons, each leading to 4 different types of searches
- Regular Search Button: A regular video search
- Playlist Search Button: A search for playlists specifically
- Video ID Button: Instead of a search, if you know the video ID, type it here and it will go straight to the video
- Playlist ID Button: Like the video ID button, this will take you directly to the playlist instead of searching for it
Understanding React State (useState)
Before we build the search bar, we need a way to keep track of what the user is typing into it. In React, regular variables don’t work for this because updating them doesn’t tell the page to re-render and show the new text.
Instead, we use a React Hook called useState. It allows us to create a special variable (our state) and a function to update it. When we use the update function, React knows the state has changed and automatically updates our webpage to reflect the new data!
Here is how we use it to track an input:
1
2
3
4
5
6
7
8
9
10
11
12
13
14
import { useState } from 'react';

export default function MyComponent() {
  // We initialize our state variable 'text' to an empty string.
  // 'setText' is the function we will call to update it.
  const [text, setText] = useState("");

  return (
    <input
      value={text}
      onChange={(e) => setText(e.target.value)}
    />
  );
}
QUESTION: In the
onChangeevent above, what ise.target.valueand where does it come from?
Handling Button Clicks
To make our navigation buttons work, we will also need the onClick() event handler. Let’s see how that combines with navigation!
Using NextJS useRouter for Navigation
While Link is great for simple buttons and images, sometimes you need to navigate to a page after some logic runs—like when a user submits a search form!
For programmatic navigation, Next.js provides the useRouter hook. It’s basically NextJS’s <a> tag for javascript functions.
1
2
3
4
5
6
7
8
9
10
11
12
13
14
15
16
17
18
import { useRouter } from 'next/navigation';

export default function MyComponent() {
  const router = useRouter();

  const handleAction = () => {
    // Sends you to another route in your website without reloading the page!
    router.push('/specified/path');

    // You can also refresh the current route you are at
    // router.refresh();

    // Or go back in your browser history
    // router.back();
  };

  // ...
}
Click below to unblur the different parts of the answer
Part 1: State and Navigation Setup First, we need to set up our React state to keep track of what the user types into the search bar. We also initialize useRouter() so we can send the user to different pages when they click the buttons.
1
2
3
4
5
6
7
8
9
10
11
12
13
14
15
16
17
18
19
20
21
"use client";

import React, { useState } from "react";
import { useRouter } from "next/navigation";

export default function Home() {
 const [input, changeInput] = useState("");
 const router = useRouter();

 const handleInputChange = (e) => {
   changeInput(e.target.value);
 };

 const handleSubmit = (e) => {
   e.preventDefault();
   if (input.trim() !== "") {
     router.push(`/search/${input}`);
   }
 };

 // ... return statement below ...
Part 2: The Search Form Next, we build the search form. We tie the <input> value to our state, and when the user presses Enter (triggering onSubmit), we prevent the default page reload and use router.push() to navigate to the search results!
Please don’t skip through without giving it a solid attempt :)
1
2
3
4
5
6
7
8
9
10
11
12
13
14
15
16
17
18
19
 // ... inside Home() return statement ...
 return (
   <div>
     <div>
       <h1>Focus</h1>
       <h1>Tube</h1>
     </div>
     <div>
       <form onSubmit={handleSubmit}>
         <input
           value={input}
           onChange={handleInputChange}
           type="text"
           placeholder="Search for something..."
         />
         <button type="submit">Search</button>
       </form>
     </div>
     {/* ... navigation buttons below ... */}
Part 3: The Navigation Buttons Finally, we add our quick-navigation buttons. Since these don’t require a form submission, we can just use simple onClick events to check if the input is empty, and if not, route the user to the correct page.
1
2
3
4
5
6
7
8
9
10
11
12
13
14
15
16
17
18
19
20
21
22
23
24
25
26
27
28
29
30
31
32
33
     {/* ... inside Home() return statement ... */}
     <div>
       <button
         onClick={() => {
           if (input.trim() !== "") {
             router.push(`/playlist-search/${input}`);
           }
         }}
       >
         Search Playlists
       </button>
       <button
         onClick={() => {
           if (input.trim() !== "") {
             router.push(`/playlists/${input}`);
           }
         }}
       >
         Search Playlist ID
       </button>
       <button
         onClick={() => {
           if (input.trim() !== "") {
             router.push(`/video/${input}`);
           }
         }}
       >
         Search Video ID
       </button>
     </div>
   </div>
 );
}
QUESTION: We had to add
"use client";to the top of ourapp/page.jsfile, otherwise NextJS would crash. What does"use client";do, and why do React hooks likeuseStaterequire it?
Layout Page
This page is unique in NextJS, but is also very powerful.
The layout page is the UI that is shared between routes.
What does that mean specifically? Well, have you noticed that every single part of the web app has had the same colors and font? That is thanks to layout.js.
No matter where you are in the website, what is in the layout page is applied there as well.
This often includes:
- Any CSS you want to add
- Headers and/or footers
- A navigation bar for the entire website
Feel free to make your Layout page your own. Luckily, NextJS already has a really useful one made for you that you can tweak!
OPTIONAL: TailwindCSS
This portion is optional because I want this tutorial to focus more on APIs and NextJS. However, if you are interested in learning more about TailwindCSS, you can try it out on this project! TailwindCSS has shown to be a very powerful library especially when it comes to AI.
If not, you are free to use the provided TailwindCSS classes if you would like to change the appearance of your web app.
TailwindCSS is a different way of doing CSS. There are no .css files; instead, you add classes for each style you want.
For example, in regular CSS, you may make a .css file then add the class to your HTML like this:
1
2
3
4
5
.center-div {
   display: flex;
   justify-content: center;
   align-items: center;
}
1
<div className="center-div"> Hello World </div>
In TailwindCSS, each one of these attributes is its own class that we can add straight to the HTML. For example:
1
<div className="flex justify-center items-center"> Hello! </div>
For a deeper dive, I highly suggest Fireship’s 100-second video on TailwindCSS.
What Mine Looks Like
Feel free to copy this TailwindCSS if you don’t want to spend the tutorial fighting CSS. However, I encourage you to make this your own and make it look how you want it to.
app.js
Click below to unblur the different parts of the answer
Part 1: State and Navigation Setup First, we need to set up our React state to keep track of what the user types into the search bar. We also initialize useRouter() so we can send the user to different pages when they click the buttons.
1
2
3
4
5
6
7
8
9
10
11
12
13
14
15
16
17
18
19
20
21
22
23
24
"use client";

import React, { useState } from "react";
import { useRouter } from "next/navigation";


export default function Home() {
 const [input, changeInput] = useState("");
 const router = useRouter();


 const handleInputChange = (e) => {
   changeInput(e.target.value);
 };


 const handleSubmit = (e) => {
   e.preventDefault();
   if (input.trim() !== "") {
     router.push(`/search/${input}`);
   }
 };

 // ... return statement below ...
Part 2: The Search Form Next, we build the search form. We tie the <input> value to our state, and when the user presses Enter (triggering onSubmit)
1
2
3
4
5
6
7
8
9
10
11
12
13
14
15
16
17
18
19
20
21
22
23
24
25
26
27
28
29
30
31
 // ... inside Home() return statement ...
 return (
   <div className="w-screen h-screen flex items-center justify-center flex-col">
     <div className="flex m-3 p-3">
       <div className="w-fit h-fit flex items-center justify-center p-1">
         <h1 className="italic text-white text-4xl">Focus</h1>
       </div>
       <div className="bg-red-800 flex items-center justify-center p-1 rounded-lg">
         <h1 className="text-white text-4xl">Tube</h1>
       </div>
     </div>


     <div className="mt-6 w-full flex justify-center">
       <form onSubmit={handleSubmit} className="w-full max-w-2xl px-4 flex gap-2">
         <input
           value={input}
           onChange={handleInputChange}
           type="text"
           className="bg-neutral-700 text-white pl-4 pr-4 py-3 rounded-full w-full text-lg outline-none focus:ring-2 focus:ring-red-800"
           placeholder="Search for something..."
         />
         <button
           type="submit"
           className="bg-red-800 text-white px-6 py-2 rounded-full text-lg hover:bg-red-700 active:bg-red-900 transition-colors duration-150 cursor-pointer"
         >
           Search
         </button>
       </form>
     </div>
     {/* ... navigation buttons below ... */}
QUESTION: You saw it introduced up above, but it is critical to our pages triggers. What is a <form> element? Does it change how we format the page?
Part 3: The Navigation Buttons Finally, we add our quick-navigation buttons. Since these don’t require a form submission, we can just use simple onClick events to check if the input is empty, and if not, route the user to the correct page.
1
2
3
4
5
6
7
8
9
10
11
12
13
14
15
16
17
18
19
20
21
22
23
24
25
26
27
28
29
30
31
32
33
34
35
36
37
38
39
40
     {/* ... inside Home() return statement ... */}
     <div className="mt-10 flex flex-wrap justify-center gap-4">
       <button
         onClick={() => {
           if (input.trim() !== "") {
             router.push(`/playlist-search/${input}`);
           }
         }}
         className="bg-neutral-600 text-white px-4 py-2 rounded-2xl hover:bg-neutral-500 active:bg-neutral-700 transition"
       >
         Search Playlists
       </button>


       <button
         onClick={() => {
           if (input.trim() !== "") {
             router.push(`/playlists/${input}`);
           }
         }}
         className="bg-neutral-600 text-white px-4 py-2 rounded-2xl hover:bg-neutral-500 active:bg-neutral-700 transition"
       >
         Search Playlist ID
       </button>


       <button
         onClick={() => {
           if (input.trim() !== "") {
             router.push(`/video/${input}`);
           }
         }}
         className="bg-neutral-600 text-white px-4 py-2 rounded-2xl hover:bg-neutral-500 active:bg-neutral-700 transition"
       >
         Search Video ID
       </button>
     </div>
   </div>
 );
}
Search Page
1
2
3
4
5
6
7
8
9
10
11
12
13
14
15
16
17
18
19
20
21
22
23
24
25
26
import Link from "next/link";

export default function SearchPage() {
 return (
   <div className="w-screen min-h-screen flex flex-col items-center justify-start text-white">
     <h1 className="text-4xl mt-6 mb-4">Search Results</h1>


     <div className="flex flex-col items-center w-full overflow-y-auto pb-10">
       <Link href="/video" className="w-1/2 max-w-3xl bg-neutral-700 rounded-2xl p-3 m-3 flex items-start gap-3">
         <img
           src="https://i.ytimg.com/vi/abc123/mqdefault.jpg"
           alt="How to Learn JavaScript Fast"
           width={160}
           height={120}
           className="rounded-md shrink-0 object-fill"
         />
         <div className="flex flex-col justify-start h-full p-3">
           <h2 className="text-lg font-semibold leading-tight mb-1"> How to Learn JavaScript Fast</h2>
           <p className="text-sm text-gray-300 leading-snug">A quick guide to getting started with JavaScript.</p>
         </div>
       </Link>
     </div>
   </div>
 );
}
Video Page
1
2
3
4
5
6
7
8
9
10
11
12
13
14
15
export default function Content() {
 return (
   <div className="h-lvh w-lvw flex flex-col items-center justify-start text-white">
     <iframe
       width="960"
       height="540"
       src="https://www.youtube.com/embed/your-youtube-video-id-here"
       title="YouTube video player"
       frameBorder="0"
       allowFullScreen
       className="rounded-lg shadow-lg"
     ></iframe>
   </div>
 );
}
Playlist Page
Since you previously implemented the playlist page on your own, I will not be providing code here. Feel free to copy from the search page or make it on your own.
Dynamic Routing
For many websites, it is impossible to hardcode every single page. This is one such case, as it needs to be able to render any video on youtube.
Luckily, NextJS has a pretty simple way to make the webpage differ based on the url provided. It’s called Dynamic Routing.
Here is an example:
I have this route in my app:
app/video/page.js
Currently, this is kind of useless because there is only one video. However, with dynamic routing, we can insert the Video ID into the url to affect the webpage.
In order to implement this, you will need to create a new folder inside your route folder. It should look like this:
app/route/[routeId]/page.js
NextJS only knows you have a dynamic route in the folders with brackets around them.
Pay attention to what you name the folder inside the brackets. That is what we will need to call in the next section.
Where we need Dynamic Routing
We need dynamic routing pretty much anywhere the webpage is impacted by the url parameters, which happens to be all of our routes in this case.
So, you should:
- Make a new folder in all routes (/search, /video, /playlist)
- Name your new folders whatever you want, it just has to be in brackets to work:
[name] - Move the page.js file in each route into each dynamic route folder
Your file tree should now look like this:
1
2
3
4
5
6
7
8
9
10
11
12
13
14
15
16
17
18
19
20
21
22
23
24
25
26
my-app/
├── node_modules/
├── public/
├── src/
│   └── app/
│       ├── favicon.ico
│       ├── globals.css
│       ├── layout.js
│       ├── page.js
│       ├── playlist/
│       │   └── [playlistId]/
│       │       └── page.js
│       ├── search/
│       │   └── [searchId]/
│       │       └── page.js
│       └── video/
│           └── [videoId]/
│               └── page.js
├── .gitignore
├── eslint.config.mjs
├── jsconfig.json
├── next.config.mjs
├── package-lock.json
├── package.json
├── postcss.config.js
└── README.md
Now go to each route by typing /route/[anything you want here]
Also, notice if you go to just /route there will be nothing now. This is because page.js has been moved into the dynamic route, so can no longer be found from /route.
Using params
The biggest reason why we use these dynamic routes is it makes it easy to pass information to the page via a URL.
In order to do so, we call the params.
- The params are the dyanmic route parameters, so whatever is passed in the URL can be called using params
1
2
3
4
5
6
7
8
9
10
11
12
13
// Here is an example on how to call parameters


export default function Route({ params }) {
   const { id } = params;
   // IMPORTANT:
   // See how I call 'id', this should be replaced with what you titled
   // your folder, if you followed my naming convention you would put
   // searchId, videoId, or playlistId


   return (<p> This is a Route with the URL Containing {id} </p>);
}
Implementing
Since all of our routes are dynamic, in every route, call params and integrate it in someway to your component, it does not have to make sense yet, that is for later.
The code I gave you had an error, it is not a major error (for now), click Fn + F12 and it will show you the error. Read the document it provides to correct your code
Answer below
1
2
3
4
5
6
7
8
9
10
11
12
// Just kidding, this is not the answer


// However, I will put the link to the documentation here, as it
// contains exactly what you need


// https://nextjs.org/docs/messages/sync-dynamic-apis


// As a programmer, always remember to use the documentation; it is there
// for a reason!
Challenge Task
Make the parameter in the /video/[ videoId ]/page.js determine the video id
HINT: Look at how the embedded video URL is formatted
Client vs SSR
React is a primarily “Client Side Library”. What does this mean?
- Client Side Rendering means the browser receives basic HTML page with links to the JS files. Basically, its running purely on your browser.
NextJS has both Client side rendering, as well as Server Side Rendering
What is Server Side Rendering?
- Server Side Rendering (SSR) is the process of rendering the webpage fully on the server and then sending the fully rendered HTML to the client
By default, NextJS is SSR. However, we can easily make a file client side with this:
'use client'
When do I use Client vs SSR?
There are some times you CANNOT use client side. Your code should be SSR if you meet any of this criteria:
- You need fresh data in every response
- It is important for the page to be fully rendered when displayed
- You access server-only secrets or credentials (ie. calling your internal API for data)
To choose which to use:
If you need to access to external data or something confidential before the page loads, use SSR
If the data can be fetched after the page loads or you are making an interactive page with UI updates (ie. useState()), use CSR.
QUESTION: Think of an example use case for both SSR and CSR
Implementing Client Side Rendering
We are going to have 2 components that use client side rendering
app/video/[videoId]/page.jsapp/page.js
Why make these two Client Side?
Web pages loading before everything is ready is fine, whereas showing incomplete results while in a search is not ideal.
Challenge Task
Make these two components client side components. When doing this, you will run into a couple errors. Attempt to Google or look at the documentartion for why you get these errors.
The solution will be provided for app/video/[videoId]/page.js. Feel free to take a look if you get stuck or when you finish to ensure are working in the right direction.
The solution for app/page.js won’t be provided since it will not throw any errors when making it a Client Side Component.
1
2
3
4
5
6
7
8
9
10
11
12
13
14
15
16
17
18
19
20
21
22
23
24
25
26
27
28
29
30
31
"use client";

import { useParams } from "next/navigation";


export default function Content() {


 // since this is NOT a server side component we CANNOT use await
 // luckily NextJS provides a useParams hook to get the params from the URL
 // this is a client side component this is our equivalent to the server side
 // of 'await params'
 const { id } = useParams();


  return (
   <div className="h-lvh w-lvw flex flex-col items-center justify-start text-white">
       <iframe
         width="960"
         height="540"
         // we can add the id directly to the src
         src={`https://www.youtube.com/embed/${id}`}
         title="YouTube video player"
         frameBorder="0"
         allowFullScreen
         className="rounded-lg shadow-lg"
       >
       </iframe>
   </div>
 );
}
Since our main page (
app/page.js) is meant to route us to other pages and is a CSR, useuseRouter()to navigate the buttons to its corresponding pages.
Loading State
When you have Service Side Components, the entire webpage renders on the server. The main problem with this is: If the content is not ready, what do we show the user?
NextJS has a very simple and easy way to solve this issue; you can make a static loading page.
- If you have a SSR Component, in the same folder, make a
loading.jsfile - This
loading.jsfile needs to be static so they can be ready right when someone loads the page.
QUESTION: As you might be picking up on, NextJS has some very useful file naming conventions. Can you think of any other useful files you may want along with your name page? Cross compare with the documentation and track if they were on there. https://nextjs.org/docs/app/api-reference/file-conventions
This is what your file tree should look like.
1
2
3
4
5
6
7
8
9
10
11
12
13
14
15
16
17
18
19
20
21
22
23
24
25
26
27
28
my-app/
├── node_modules/
├── public/
├── src/
│   └── app/
│       ├── favicon.ico
│       ├── globals.css
│       ├── layout.js
│       ├── page.js
│       ├── search/
│       │   └── [searchId]/
│       │       ├── page.js
│       │       └── loading.js
│       ├── video/
│       │   └── [videoId]/
│       │       └── page.js
│       └── playlist/
│           └── [playlistId]/
│               ├── page.js
│               └── loading.js
├── .gitignore
├── eslint.config.mjs
├── jsconfig.json
├── next.config.mjs
├── package-lock.json
├── package.json
├── postcss.config.js
└── README.md
Feel free to make your own loading.js, but if you don’t want to, here is what mine looks like:
1
2
3
4
5
6
7
export default function Loading() {
   return (
       <div className="flex w-lvw h-lvh justify-center content-center">
           <h1>Loading...</h1>
       </div>
   );
}
That is all for this section of the tutorial!
Part 2 is already posted, so whenever feel free to start it whenever you are ready.
If you made it this far, thank you and I hope this tutorial has helped you get a decent start with NextJS and React!