Syllabus To CSV
Convert your class syllabus into a CSV of all your assignments
About the project
Welcome to the Syllabus To CSV tutorial! In this project, you will learn the fundamentals of JS and learn how to create a project from start to finish.
What you will learn:
- How to setup and run a chrome extension.
- How to call REST APIs and process their responses.
- Create a basic UI with HTML and CSS.
- Interact with DOM elements with JS.
What you will make:
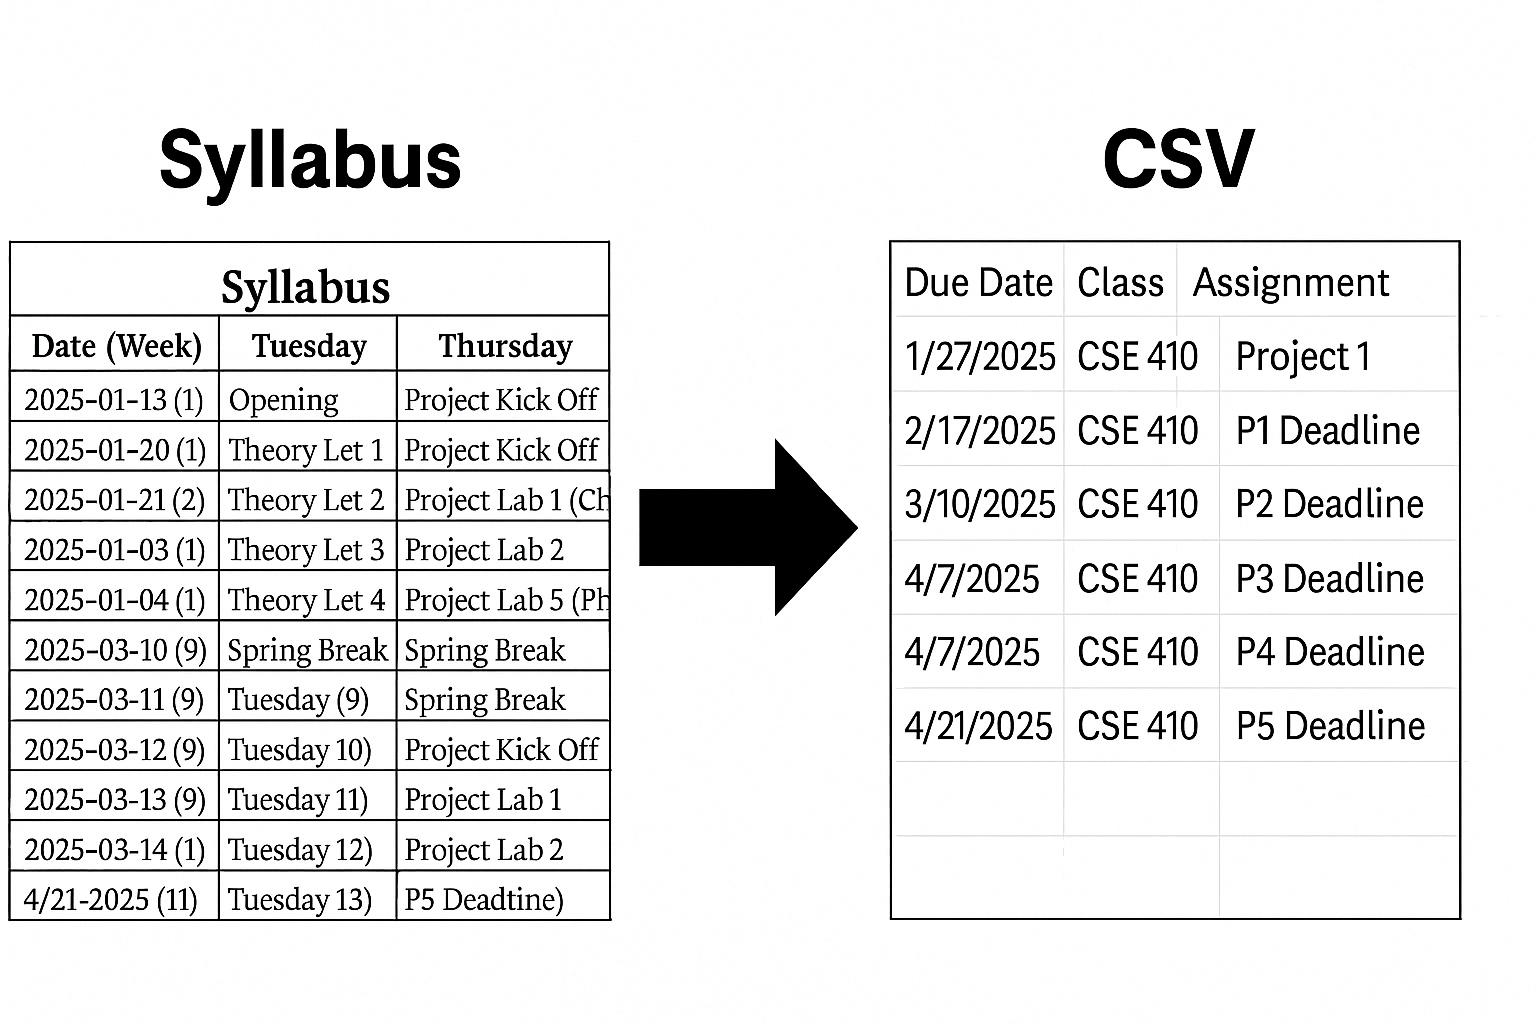
By the end of this tutorial, you will have a working chrome extension that takes a class syllabus and converts it into a CSV with all your class assignments.
Further possibilities:
Once you’ve completed this tutorial, you can expand on it in many ways! You could add different types of conversions, convert the current webpage to CSV or even an image. You can also use it to extract different information out of the syllabus, grade charts or instructor list. The possibilities are endless.
Setup
We are going to create a new GitHub repo for this project, no starter code needed.
- Navigate to GitHub desktop
- Click on the repository dropdown
- Select
Add>Create new repository - Give it a Name and optionally a description
- Click create repository
- Open in your preferred IDE
Create a file called manifest.json, make sure to give it a name and description.
1
2
3
4
5
6
7
8
9
{
    "name": "YOUR NAME HERE",
    "description": "YOUR DESCRIPTION HERE",
    "version": "1.0",
    "manifest_version": 3,
    "action": {
      "default_popup": "index.html",
    },
}
This is a setup file that tells your browser some basic info about your extension. You are telling it to use index.html as the popup, the name, description, and version of your extension along with the version of the manifest you want to use (the different manifest versions just change what parameters you have access too). There are a lot of different things you can add to the manifest.
- Images for your extension
- Background scripts
- Permissions
- Much more
Next lets create the base popup HTML. Create a file called index.html, give it a title (this can be the same as the manifest name).
1
2
3
4
5
6
7
8
9
10
11
<!DOCTYPE html>
<html lang="en">
<head>
    <meta charset="UTF-8">
    <meta name="viewport" content="width=device-width, initial-scale=1.0">
    <title>EXTENSION NAME</title>
</head>
<body>
    <h1>My super cool extension</h1>
</body>
</html>
This is telling the browser what you want the popup to look like. In the head tag you are specifying the metadata.
- What character set to use.
- How big the popup should be (default width).
- What the title of the popup should be (this is more useful with websites but still important to set).
Next in the body tag we are defining the content of the extension. For now we are just adding some text.
Set up your Browser
We will be using chrome as an example but it should be similar for most other browsers.
- Navigate to your extensions page chrome://extensions/
- Make sure to toggle it into developer mode (top right corner)
- Select
Load unpackedand select the root folder (outermost folder) of your GitHub repo - You should see your extension in the extension list
Running the project
You should see your extension in your extension list (you might need to pin it). All you need to do to “run” your extension is to click on its icon. For debugging you can right-click on the icon and select Inspect popup to open dev tools. Whenever you make a change make sure to go to the extensions page and click the reload icon at the bottom of your extensions card.
Make sure you reload your extension after changing anything or you will not see the changes.
Create a basic UI
Let’s improve the popup so users can upload their syllabus file for us to use!
Within our <body> element, we’ll add an <input> element with the type set to "file" — this allows users to select and submit their syllabus and add a respective id which we will use for our event listeners. Just below the input, we’ll include a <p> tag to let users know where they’ll be able to click and download their CSV file, which can contain text like Click here to download your file!.
Tip: Make sure to properly close both the
<input>and<p>tags.
Next, we need to connect our JavaScript to this HTML. To do that, we’ll add a <script> tag right before the closing </body> tag. The script should have type="module" and src="popup.js".
Using type="module" allows us to use modern JavaScript features such as import and export statements. The src attribute tells the browser to load the logic from our popup.js file — the place where all our “behind-the-scenes” functionality will live. Later, we’ll also update the innerHTML of the <p> tag to contain a downloadable link once the file has been processed.
Make sure to include the script tag at the bottom of the body or else your JavaScript will not work on your HTML elements.
Your index.html should finally look like this:
1
2
3
4
5
6
7
8
9
10
11
12
13
14
15
<!DOCTYPE html>
<html lang="en">
<head>
    <meta charset="UTF-8">
    <meta name="viewport" content="width=device-width, initial-scale=1.0">
    <title>Syllabus to CSV</title>
</head>
<body>
    <h1>MasterList</h1>
    <input type="file" id="file-upload" name="filename">
    <p>Click on the File to download it:<p>

    <script type="module" src="popup.js"></script>
</body>
</html>
Handle file uploads
Now that we’ve set up a file input, let’s write the JavaScript needed to handle uploaded files and prepare them for processing. Create a file in the root directoy named popup.js.
We’ll be using document.getElementById() to grab our file input and attach an event listener that runs every time a user selects a file.
1
2
3
document.getElementById('file-upload').addEventListener('change', async () => {
    // all the lines below will go inside here
});
Here, we’re listening for the “change” event on the file input id (or whatever id you used) — this fires whenever a user picks a file.
1
async () => {}
Async allows us to use await inside the function. Since we’ll likely send the file to an external API (which takes time), we want to pause and wait for the response before moving on — this keeps the code clean and readable.
Without async, we’d have to use .then() chains, which are harder to manage.
Arrow function syntax (() => {}) is a modern way to write functions in JavaScript. It’s short, clean, and avoids creating its own this context — which works well here since we don’t need to refer to the event handler’s context directly.
Tip: In short we use async () => {} to write cleaner, more modern code that lets us easily work with APIs that take time to respond.
1
const fileUploaded = this.files.item(0);
This line grabs the first file the user selected. Since we’re only supporting one file at a time, we access the file at index 0.
Below you should create your own safety check to check if fileUploaded is null. If it is, we want to return.
1
2
3
const form = new FormData();
form.append('purpose', 'ocr');
form.append('file', new File([fileUploaded], `${fileUploaded.name}`));
Here, we create a FormData object to prepare for sending the file to an external API.
FormData works like a key-value map that you can send with fetch() for things like file uploads.
We add two things:
A purpose field — this is useful if your API requires it (in this case, to label it for OCR processing).
The actual uploaded file, wrapped in a new File object.
Note: Wrapping the file again with new File([…]) is optional but helpful if you want to manipulate the name or metadata before sending.
Important: All of these lines (fileUploaded, if (fileUploaded == null), and the FormData block) should be written inside the event listener function — directly with the async () => {} function.
This is the foundation of getting the syllabus file from the user and preparing it for conversion.
At this point your code should look similar to this.
1
2
3
4
5
6
7
8
document.getElementById('file-upload').addEventListener('change', async () => {
    const fileUploaded = this.files.item(0);
    if(fileUploaded == null){
        return;
    }
    const form = new FormData();
    form.append('purpose', 'ocr');
    form.append('file', new File([fileUploaded], `${fileUploaded.name}`));
In the next step, we’ll send this FormData to an OCR model for parsing and response.
Getting Your first API Key
Before we can send our syllabus to an AI model, we need an API key to authenticate with Mistral OCR, the model we’ll be using to process and extract text from PDF files.
What is Mistral OCR?
Mistral OCR is a powerful AI model that can extract structured information from scanned documents, including PDFs — which is exactly what we need for turning a syllabus into a list of assignments.
Learn more: Mistral OCR announcement
What is an API?
Before we use Mistral OCR, let’s take a quick step back and understand what an API actually is.
An API (Application Programming Interface) is a way for two programs to talk to each other. In our case, we’ll be using JavaScript to talk to an external AI service (Mistral) — and that conversation happens through an API.
Think of it like placing an order at a restaurant: you (the client) tell the waiter (the API) what you want, and the waiter brings it from the kitchen (the server). You don’t need to know how the kitchen works — just how to place an order properly.
Helpful Videos
What is an API? (by Simply Explained)
This video explains APIs using real-world analogies — perfect if you’re just starting out.4 Most Important HTTP Requests That Can Be Made to an API
This breaks down the core HTTP methods you’ll use when working with APIs: GET, POST, PUT, and DELETE.
What is an API Key?
An API key is like a password that allows your project to communicate with a third-party service (in this case, Mistral). It tells the API who you are and whether you’re allowed to use it.
Think of it like a secret access badge — you’ll need one to send your file and get a response from Mistral.
Step 1: Get your Mistral API Key
- Go to https://console.mistral.ai/api-keys
- Log in or create an account
- If this is your first time, you’ll be prompted to choose an API plan — make sure to select the free one
- Click “Create API Key”
- Copy the key — it will look something like: mistral-key-abc1234567890
Important: If you skip selecting a plan, your API key won’t be usable yet. Be sure to select the free tier after signing up so you can continue with the tutorial.
Step 2: Create a hidden.js file
To keep your API key separate from your main code (and avoid accidentally uploading it), let’s store it in a new file.
Create a file called: hidden.js
And inside it, write:
1
2
3
4
5
6
7
const mistralApiKey = "your-mistral-api-key-here";
const geminiApiKey = "your-gemini-api-key-here"; // for using Gemini later

export default {
  mistralApiKey,
  geminiApiKey
};
Never commit this file to GitHub! If you’re using Git, be sure to add
hidden.jsto your.gitignore.
What is a .gitignore file?
When you use Git to track your project’s files (like code, images, config files), you don’t always want everything to be tracked or pushed to GitHub. That’s where .gitignore comes in.
A
.gitignorefile tells Git: Ignore these files. Don’t include them in version control or upload them to GitHub.
This is really helpful for:
- Sensitive files (like API keys in
hidden.js) - Build folders (dist/, node_modules/, etc.)
- System files (like .DS_Store on macOS or Thumbs.db on Windows)
How it works
If a file or folder matches a rule in .gitignore, Git will pretend it doesn’t exist. It won’t track changes to it, and it won’t push it to a remote repo like GitHub.
How to add something to .gitignore
Just open the .gitignore file in your project root (or create one if it doesn’t exist), and add the filename or folder you want to ignore.
For example:
# Ignore API key file
hidden.js

# Ignore all files in node_modules/
node_modules/
Now Git will skip these files when committing or pushing your code — keeping things secure and clean.
Best practice: Always add secret files like
hidden.jsto.gitignorebefore uploading your project to GitHub.
Step 3: Import your API keys
In your popup.js, import them like this:
1
2
3
import apiKeys from "./hidden.js";
const mistralApiKey = apiKeys.mistralApiKey;
const geminiApiKey = apiKeys.geminiApiKey;
You’re now ready to securely connect to Mistral and begin sending files for parsing! Next up: we’ll write the code that sends our FormData to the Mistral OCR API!
Convert upload to PDF
Now that we’ve built our FormData object containing the uploaded syllabus file, we’re ready to send it to Mistral’s OCR API for processing.
We’ll do this using JavaScript’s fetch() function — this allows us to make requests to APIs directly from the browser.
Here’s the full function:
1
2
3
4
5
6
7
8
9
10
11
12
13
14
15
16
17
18
/**
 * Convert a PDF to a JSON object
 *
 * @param {FormData} form
 * @returns {Promise<Object>}
 */
async function PDFToJson(form) {
    const uploadedPDF = await fetch('https://api.mistral.ai/v1/files', {
        method: 'POST',
        headers: {
            "Authorization": `Bearer ${mistralApiKey}`
        },
        body: form,
    });

    const PDFJson = await uploadedPDF.json();

}
Let’s break it down step-by-step:
The comment block at the top
1
2
3
4
5
6
/**
 * Convert a PDF to a JSON object
 *
 * @param {FormData} form
 * @returns {Promise<Object>}
 */
This is a JSDoc-style comment, which is a great practice even in beginner projects. It tells other developers (or future you):
- What this function does
- What kind of argument it expects (FormData)
- What it returns (a promise that resolves to a JSON object)
Writing clear comments like this helps others understand your code quickly and makes your project easier to maintain or expand in the future.
Fetch
1
fetch('https://api.mistral.ai/v1/files', { ... })
This is the URL of Mistral’s file upload API. When we call this, we’re telling Mistral:
“Hey, I want to upload a file for OCR processing.”
1
method: 'POST'
This tells the API we want to send data (in this case, the file). There are other methods like GET, PUT, and DELETE, but POST is most common for sending form or file data.
Headers
1
headers: { "Authorization": "Bearer ... " }
APIs often require authentication — this is how they know who you are.
The “Authorization” header tells the API,
“Here’s my API key — please allow me to use your service.”
“Bearer” is the standard keyword used to pass tokens securely.
You should already have your API key stored in hidden.js, and here we’re inserting it using backticks and ${} for string interpolation.
Body
1
body:form
This is the actual file upload! We’re sending the FormData object we created earlier (which includes the PDF file) as the body of the request.
1
await uploadedPDF.json()
Once Mistral finishes processing the file, it sends back a response — usually in JSON format.
If you don’t call
.json()and just look at theresponseobject itself, you’ll get a network response object, not the actual data.
We call .json() on the response to convert it into an object we can work with in JavaScript.
What does Mistral send back?
It doesn’t send back the converted syllabus — not yet.
Instead, it responds with file metadata, like this:
1
2
3
4
5
6
{
  "id": "file-abc123",
  "status": "uploaded",
  "filename": "syllabus.pdf",
  "created_at": "2024-03-23T15:12:00Z"
}
This response tells us:
The upload was successful!
We now have a file ID that we can use to request a signed download URL in the next step
The OCR processing hasn’t happened yet — we’ll request it next!
Important: This function does not do OCR yet. It only uploads the file and gives back an ID. We’ll use this ID in a follow-up request to get the downloadable link and send that to Mistral’s OCR model.
Upload PDF to get URL
Now that we’ve uploaded the file, Mistral gave us a file ID in the response. We’re going to use that ID to request a signed file URL — a secure, temporary link to download or reference the uploaded file.
Make the API Call
Use the fetch() function to make a GET request to this endpoint: https://api.mistral.ai/v1/files/FILE_ID/url?expiry=24
Replace
FILE_IDwith the ID you received from the previous step (PDFJson.id)
This tells Mistral:
“Please give me a temporary link to access the file I just uploaded.”
The expiry=24 part means the link will only work for 24 hours.
Headers You’ll Need
Your request should include a headers object with the following:
1
2
3
4
headers: {
  "Accept": "application/json",
  "Authorization": `Bearer ${mistralApiKey}`
}
What does “Accept”: “application/json” mean? This tells the server:
“Hey, I expect the response to be in JSON format.”
Without it, some APIs may return unexpected formats or not work as intended.
Your Goal
Make the fetch() call using the correct method (GET)
Pass in the required headers
Use .json() to extract the result into a usable object (just like we did when uploading the file)
Once you’ve done that, you’ll have access to a temporary URL like:
1
2
3
{
  "url": "https://cdn.mistral.ai/files/abc123/syllabus.pdf?token=..."
}
We’ll use that URL in the next step when we send the file to Mistral’s OCR model for analysis!
Hint: Store the result in a variable like responseJSON, then access the URL with responseJSON.url
Parse PDF to Markdown
Now that you’ve obtained a temporary URL to the uploaded file, it’s time to send that file to Mistral’s OCR model and get back structured text.
Your Turn: Make the OCR API Call
You’re going to use fetch() again — this time to POST the signed URL to Mistral’s OCR endpoint.
API Endpoint: https://api.mistral.ai/v1/ocr
In your request, you’ll need these headers:
1
2
3
4
headers: {
  "Content-Type": "application/json",
  "Authorization": `Bearer ${mistralApiKey}`
}
The Body (What You’re Sending) Before we send the body, we need to convert our JavaScript object into a string using JSON.stringify().
What is JSON.stringify()? APIs expect request bodies to be sent as JSON strings — not raw JavaScript objects. JSON.stringify() takes an object and converts it into a JSON-formatted string that can be sent in the request.
1
2
JSON.stringify({ name: "Arnav" });
// -> '{"name":"Arnav"}'
Now, here’s the structure of the object you’ll send:
1
2
3
4
5
6
7
8
{
  "model": "mistral-ocr-latest",
  "document": {
    "type": "document_url",
    "document_url": "THE_TEMPORARY_URL_HERE"
  },
  "include_image_base64": true
}
Replace “THE_TEMPORARY_URL_HERE” with responseJSON.url from the previous step.
Your Goal
- Use fetch() with method ‘POST’
- Add the correct headers
- Convert the body to a JSON string using JSON.stringify()
- Use .json() to extract the result
- Return the variable that extracted the result
Parse upload into assignment list
Now that you’ve received the OCR response from Mistral, it’s time to prepare the text for assignment extraction.
The OCR response (ocrJson) contains a list of pages — and each page includes a markdown field with the text that Mistral pulled from that page.
We want to loop through all those pages and combine the Markdown into one big string we can send to an AI model later.
Your Task: Combine All Markdown Pages
Follow these steps to build the final syllabus content:
Store the OCR response
You should already have a variable that holds the full response from your OCR request. If not, make sure you’re calling the correct function to get that data.
Create a variable to store all the text
Start with an empty string. This will hold the full Markdown content once you’re done.
Loop through each page
Use a
for...ofloop to go through thepagesarray in the response.Inside the loop, access the
markdownfield of each pageEach page object contains a
markdownproperty — that’s the extracted content from that page.Append each
markdownsnippet to your stringAdd each page’s Markdown to your full text variable. Make sure to include a space or newline between pages so they don’t get mashed together.
(Optional) Print the final Markdown
Once your loop is done, use
console.log()to print the final result and make sure it looks correct.
Why are we doing this?
By combining all the page content into one Markdown string, we can pass it to an AI model in a single prompt and ask it to extract assignments for us — much easier than handling one page at a time!
Next, we’ll send that full Markdown string to an AI to find and extract a list of assignments.
Sending upload to gemini
Now that you’ve combined all of your syllabus content into a single Markdown string, you’re ready to send it to an AI model — in this case, Google Gemini — to extract your assignments and return them in a clean CSV format.
Step 1: Get Your Gemini API Key
To use Gemini, you’ll need to create an API key from Google’s developer console.
- Go to https://ai.google.dev/gemini-api/docs/api-key
- Sign in with your Google account
- Click Create API Key
- Copy the key and store it safely — we’ll use this in our fetch request
Just like we did with Mistral, you should store this key in your hidden.js file:
1
const geminiApiKey = "your-gemini-api-key-here";
Your Task: Send the Markdown to Gemini Here’s what you need to do:
Create this function
1
async function JsonToCSV(markdownExport) {}
Use fetch() to send a POST request to this Gemini endpoint:
https://generativelanguage.googleapis.com/v1beta/models/gemini-2.0-flash:generateContent?key=YOUR_API_KEY
Replace YOUR_API_KEY with your Gemini key (preferably from hidden.js).
In the headers, include:
1
"Content-Type": "application/json"
In the body of the request:
- Use JSON.stringify() to convert your request body to JSON
- Create a prompt asking Gemini to extract assignments from the Markdown you created
- Ask for a CSV format with these columns:
- Due Date
- Class
- Assignment Name
- Assignment Type (from: Homework, Reading, Project, Exam)
- Checkbox
Make sure to include your entire markdownExport inside the prompt using a template string (${}).
Tip: The more specific and clear your prompt is, the better your results will be. You’re essentially saying: “Hey Gemini, here’s a syllabus in Markdown. Can you pull out the assignments and return them in a neat table?”
Your goal here is to get back a Gemini response containing a CSV-formatted list of assignments from your syllabus.
We’ll use this response in the next step to create a downloadable .csv file the user can save!
Downloading the file
Now that Gemini has returned your assignment list in CSV format, the final step is to let the user download it!
We’ll do this by programmatically creating a downloadable file in the browser using JavaScript.
Here’s the function you’ll use:
1
2
3
4
5
6
7
8
9
10
11
function createFileAndDownload(filename, content) {
    const blob = new Blob([content], { type: 'text/plain' });
    const url = URL.createObjectURL(blob);
    const link = document.createElement('a');
    link.href = url;
    link.download = filename;
    document.body.appendChild(link);
    const p = document.createElement('p');
    p.innerHTML = filename;
    link.append(p);
}
How does this work?
new Blob([content]): This creates a binary object (Blob) from your text. Think of it like a fake file we can give to the browser.
URL.createObjectURL(blob): Generates a temporary download link from the Blob.
document.createElement(‘a’): We create an anchor () tag and set its href to our blob URL.
link.download = filename: This tells the browser what to name the downloaded file.
Finally, we append the link (with a label) so the user can click and download it.
You can now call this function like so:
1
createFileAndDownload("assignments.csv", geminiResponse);
If your response string includes some extra characters (like Markdown code block markers), make sure to clean it up first:
1
2
const cleaned = geminiResponse.slice(6).slice(0, -3);
createFileAndDownload("assignments.csv", cleaned);
Finishing our Event Listener
By the end of this tutorial, your full addEventListener function should look something like this:
1
2
3
4
5
6
7
8
9
10
11
12
13
14
15
16
17
18
19
20
21
22
23
24
25
26
27
28
document.getElementById('file-upload').addEventListener('change', async () => {
    // Get fileUploaded, returns file object at index 0
    const fileUploaded = this.files.item(0);
    if (fileUploaded == null) {
        return;
    }

    // Create form object for PDF send to OCR API
    const form = new FormData();
    form.append('purpose', 'ocr');
    form.append('file', new File([fileUploaded], `${fileUploaded.name}`));

    // Send to Mistral and get structured markdown
    let ocrJson = await PDFToJson(form);

    // Combine all markdown content into one string
    let markdownExport = "";
    for (const element of ocrJson.pages) {
        markdownExport += element.markdown + " ";
    }

    // Send combined markdown to Gemini for CSV generation
    const geminiJson = await JsonToCSV(markdownExport);
    const geminiResponse = geminiJson.candidates[0].content.parts[0].text;

    // Download the result as a .csv file
    createFileAndDownload("downloadable.csv", geminiResponse.slice(6).slice(0, -3));
});
That’s it! You’ve now built a full Chrome extension that lets users upload a syllabus, extracts all assignments using AI, and downloads the results as a clean CSV file.
Extending your extension
Congratulations on finishing the core project! 🎉 Here are some exciting directions you can take it next:
Pull syllabi directly from the current webpage instead of uploading a PDF!
Integrate photo uploads and use OCR to extract text from syllabus images!
Send data straight to Google Sheets instead of downloading a CSV!
Add editing tools, filters, or even reminders based on due dates!
Let users share and browse parsed syllabi from others!
This project is a great base — now make it your own!
=======