Part 2: Frontend setup
Part 2: Frontend setup
Now that our backend is set up, let’s move on to creating the frontend of our application. We will use Vite as frontend template.
Basic setup
First, outside the backend folder, run
1
npm create vite@latest
Then, enter your project name, choose React and TypeScript. After that, you can run
1
2
3
4
cd frontend
npm install
npm install axios jwt-decode react-router-dom
npm run dev
Login page
Now your app should run. However, we won’t need the app template file. You can delete the css import in main.tsx, and edit the App.tsx file into
1
2
3
4
5
6
7
8
9
10
11
12
13
14
15
16
17
18
19
20
21
22
23
24
25
26
27
28
29
30
31
32
33
34
35
36
37
38
39
40
41
42
43
44
45
46
47
48
49
50
51
52
53
54
55
56
57
58
import { useState, useEffect } from "react";
import axios from "axios";

function App() {
  const [username, setUsername] = useState("");
  const [password, setPassword] = useState("");

  interface Credentials {
    username: string;
    password: string;
  }

  const handleLoginBackend = async (credentials: Credentials) => {
    console.log("Submitting credentials:", credentials);
  };

  const handleLogin = async (event: React.FormEvent<HTMLFormElement>) => {
    event.preventDefault();

    const credentials: Credentials = {
      username,
      password,
    };

    await handleLoginBackend(credentials);
  };

  return (
    <>
      <h1>login</h1>
      <form onSubmit={handleLogin}>
        <div>
          username
          <input
            type="text"
            value={username}
            name="Username"
            onChange={(e) => setUsername(e.target.value)}
          />
        </div>

        <div>
          password
          <input
            type="password"
            value={password}
            name="Password"
            onChange={(e) => setPassword(e.target.value)}
          />
        </div>

        <button type="submit">Login</button>
      </form>
    </>
  );
}

export default App;
After this we can have a simple login form that look like this (the register button is not present here, but overall the login should look like this):
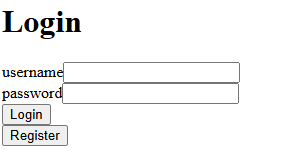
First the form have two states: username and password, contained within a form, and set up to change as the user edit the text fields. Then, the submit button is named login and linked to handleLogin. event.preventDefault() is to prevent the page from reloading. Notice that handleLogin is currently calling a placeholder handleLoginBackend.
TASK: Create function
handleLoginBackendthat will send the credentials (username and password) to the backend/api/login. If valid, persist the returned JWT within React state. (You can use Axios).
Answer (click to unblur):
1
2
3
4
5
6
7
8
9
10
11
12
13
14
15
16
17
18
19
20
21
22
23
function App() {
  // ...
  const [jwt, setJwt] = useState<string | null>(null);

  // ...

  const handleLoginBackend = async (credentials: Credentials) => {
    const baseUrl = "/api/login";

    try {
      const response = await axios.post(baseUrl, credentials);
      const token = response.data.token;

      setJwt(token);
    } catch (error) {
      console.error("Login failed:", error);
    }
  };

  // ...
}

export default App;
Backend proxy
Before we move on, if you just send requests from frontend to backend like right now, chances are it will not work. If you open the console, it would be filled with errors. This is because of something called the same origin policy. To explain shortly, it’s a security feature: your frontend is running default on port 5173 (Vite default), and backend on port 3000, so they cannot communicate since they’re not on the same origin.
To mitigate this, configure CORS on the backend or add a proxy in your vite.config.ts (pointing to your backend running on port 3001):
1
2
3
4
5
6
7
8
9
10
11
12
13
14
15
16
17
18
19
20
import { defineConfig } from 'vite';
import react from '@vitejs/plugin-react';
import path from 'path';

export default defineConfig({
  plugins: [react()],
  resolve: {
    alias: {
      '@shared': path.resolve(__dirname, '../shared')
    }
  },
  server: {
    proxy: {
      "/api": {
        target: "http://localhost:3001",
        changeOrigin: true,
      },
    }
  }
});
Also, ensure your frontend/tsconfig.json includes the @shared/* path mapping so TypeScript resolves the shared types:
1
2
3
"paths": {
  "@shared/*": ["../shared/*"]
}
With this, you can communicate directly with the server. If you want to test your frontend code in real-time, first run your backend, then run your frontend, and your requests to /api will be proxied automatically.
Displaying contacts & JWT Decoding
Next, after the user logs in, we display their contacts. To ensure users only see their own contacts, we use jwt-decode to read the user’s username directly from the client-side JWT payload:
1
2
3
4
5
6
7
8
9
10
11
12
13
14
15
16
17
18
19
20
21
22
23
24
25
26
27
28
29
30
31
32
33
34
35
36
37
38
39
40
41
42
43
function App() {
  const [jwt, setJwt] = useState<string | null>(null);
  const [contacts, setContacts] = useState([]);

  const payload = jwt !== null
    ? jwtDecode<JwtPayload>(jwt)
    : null;

  useEffect(() => {
    if (payload !== null && jwt) {
      const contactUrl = "/api/contacts";
      const token = jwt;

      const config = {
        headers: { Authorization: `Bearer ${token}` },
      };

      axios.get(contactUrl, config).then((response) => {
        setContacts(response.data.filter(
          contact => contact.belongsTo.username === payload.username
        ));
      });
    }
  }, [payload, jwt]);

  return (
    <>
      {/* login form */}
      {jwt !== null && (
        <div>
          <h2>Your Contacts</h2>
          {contacts.map((contact) => (
            <div key={contact.id}>
              {contact.name} {contact.number}
            </div>
          ))}
        </div>
      )}
    </>
  );
}

export default App;
The approach works like this: When jwt is null, nothing happens. But then if jwt is not null, then the entire function runs again, and then payload will run first before useEffect runs. After that, when useEffect runs, it will get the token, send it, and filter the response by payload data.
NOTE: You can also update the backend
/api/contactsendpoint to return only contacts belonging to the authenticated user (req.user.id). This avoids sending all contacts across the network and filtering them in React.
Also notice JwtPayload. It is yet another defined custom types in types.ts. We will cover it right in the next part.