Notifications, contacts UI, styling, and conclusion
Notification and React Context
As our application grows, we want to provide user feedback for various actions - success messages when contacts are added, error messages when operations fail, login confirmations, etc. We want notifications that can appear from anywhere in our application: login forms, contact management, registration, and more.
Prop drilling
If we tried to implement notifications the traditional way, we’d face a problem called prop drilling. Here’s what it would look like:
1
2
3
4
5
6
7
8
9
10
11
12
13
14
15
16
17
18
19
20
21
22
// App.tsx - top level component
function App() {
  const [notification, setNotification] = useState(null);

  return (
    <LoginForm
      handleLogin={handleLogin}
      setNotification={setNotification}  // Pass down
    />
  );
}

// LoginForm.tsx - needs to pass it further down
const LoginForm = ({ handleLogin, setNotification }) => {
  return (
    <SomeChildComponent
      setNotification={setNotification}  // Pass down again
    />
  );
}

// And this continues for every component that needs notifications...
This becomes messy quickly. Every component in the chain needs to accept and pass down notification props, even if they don’t use them themselves.
React Context
React Context provides a way to share data across components without prop drilling. It’s like creating a “global” state that any component can access directly. It consists of three main parts:
- Context: A “container” that holds the data you want to share
- Provider: A component that supplies the data to its children
- Consumer: Components that use the shared data (via hooks like
useContext)
Here’s how the pattern works:
1
2
3
4
5
6
7
8
9
10
11
12
13
14
15
16
17
18
19
20
// 1. Create the Context
const MyContext = createContext();

// 2. Create a Provider
function MyProvider({ children }) {
  const [data, setData] = useState("some data");

  return (
    <MyContext.Provider value=>
      {children}  {/* All children can now access this data */}
    </MyContext.Provider>
  );
}

// 3. Use the Context in any child component
function SomeChildComponent() {
  // need this line to access data even if component is wrapped inside provider
  const { data, setData } = useContext(MyContext);
  return <div>{data}</div>;
}
The key insight is that any component wrapped by the Provider can access the context data, no matter how deeply nested it is. You should also look up the {children} property if you don’t know what it is - this is valid code.
Now let’s implement our notification context:
1
2
3
4
5
6
7
8
9
10
11
12
import { createContext } from 'react';
import type { NotificationType } from '@shared/types';

interface NotificationContextType {
  notification: NotificationType | null;
  setNotification: React.Dispatch<React.SetStateAction<NotificationType | null>>;
}

export const NotificationContext = createContext<NotificationContextType>({
  notification: null,
  setNotification: () => {}
});
Don’t be bothered by the long types - those are just boilerplates to avoid warnings. And by the way, for NotificationType:
1
2
3
4
export interface NotificationType {
  msg: string,
  type: string
}
Next, create a provider component that manages the notification state and renders notifications:
1
2
3
4
5
6
7
8
9
10
11
12
13
14
15
16
17
18
19
import { useState } from 'react';
import type { NotificationType } from '@shared/types';
import { NotificationContext } from '../contexts/NotificationContext';
import '../styles/index.css';

export const NotificationContextProvider = ({ children }: { children: React.ReactNode }) => {
  const [notification, setNotification] = useState<NotificationType | null>(null);

  return (
    <NotificationContext.Provider value=>
      {notification && (
        <div className={notification.type}>
          {notification.msg}
        </div>
      )}
      {children}
    </NotificationContext.Provider>
  );
};
In order to utilize this provider, we need to wrap components inside NotificationContextProvider. In our simple app, everywhere needs notification. So the easiest way can be wrap it around our App in main.tsx:
1
2
3
4
5
6
7
8
9
// ...

createRoot(document.getElementById('root')!).render(
  <StrictMode>
    <NotificationContextProvider>
      <App />
    </NotificationContextProvider>
  </StrictMode>,
)
By wrapping our entire app with NotificationContextProvider, we create this component hierarchy:
1
2
3
4
5
6
7
8
9
NotificationContextProvider (provides notification state)
└── App
    ├── Router
    │   ├── LoginForm (can use notifications)
    │   ├── RegisterForm (can use notifications)
    │   └── Homepage
    │       ├── ContactForm (can use notifications)
    │       └── ContactList (can use notifications)
    └── Any other components (all can use notifications)
Next, create a custom hook to make using notifications easier:
1
2
3
4
5
6
7
8
9
10
11
12
13
14
import { useContext } from "react";
import { NotificationContext } from "../contexts/NotificationContext";

export const useNotification = () => {
  // this extracts [notification, setNotification] from NotificationContext
  const { notification, setNotification } = useContext(NotificationContext);

  const showNotification = (msg: string, type: string) => {
      setNotification({ msg, type });
      setTimeout(() => setNotification(null), 5000);
  };

  return { notification, setNotification, showNotification };
}
Now any component can show notifications without prop drilling:
1
2
3
4
5
6
7
8
9
10
11
12
13
14
15
16
import { useNotification } from '../hooks/useNotification';

const LoginForm = ({ handleLogin }) => {
  const { showNotification } = useNotification();

  const onSubmit = async (event) => {
    try {
      await handleLogin(username, password);
      showNotification('Login successful!', 'success');
    } catch (error) {
      showNotification('Login failed', 'error');
    }
  };

  // ... rest of component
};
Adding new contacts
The final part is to add a small field to add new contacts to an user like this:
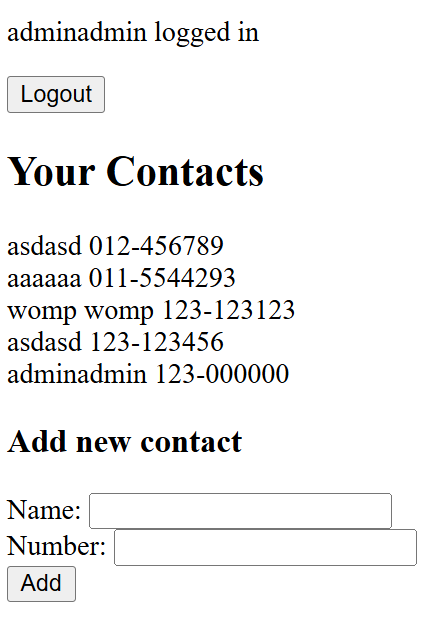
This is no different from the login form so you should do it yourself :)
(Guiding tips: Try simulating the loading state that you would normally see on websites (like a “Saving Profile…” with a loading wheel spinner)
Add styling
Currently our app have no styling at all. You can improve it by adding more CSS/Tailwind/MUI/ etc. in order to improve the appearance of the app.
There is no right answer to this. But for example, mine look like this:
1
2
3
4
5
6
7
8
9
10
11
12
13
14
15
16
17
18
19
20
21
22
23
24
25
26
27
28
29
30
31
32
33
34
35
36
37
38
39
40
41
42
43
44
45
46
47
48
49
50
51
52
53
54
55
56
57
58
59
60
61
62
63
64
65
66
67
68
69
70
71
72
73
74
75
76
77
78
:root {
  --primary-color: #2563eb;
  --error-color: #ef4444;
  --border-radius: 8px;
  --shadow-light: 0 1px 3px rgba(0, 0, 0, 0.1);
  --transition: all 0.2s ease;
}

/* Homepage Styles */
.homepage-container {
  max-width: 600px;
  margin: 40px auto;
  background: #fff;
  border-radius: var(--border-radius);
  box-shadow: var(--shadow-light);
  padding: 32px 24px;
}
.homepage-header {
  display: flex;
  justify-content: space-between;
  align-items: center;
  margin-bottom: 24px;
}
.homepage-user {
  font-weight: 600;
  color: var(--primary-color);
}
.homepage-logout {
  background: var(--error-color);
  color: #fff;
  border: none;
  border-radius: 6px;
  padding: 8px 16px;
  cursor: pointer;
  transition: var(--transition);
}
.homepage-logout:hover {
  background: #b91c1c;
}
.homepage-title {
  margin-top: 0;
  color: var(--primary-color);
}
.contacts-list {
  margin-bottom: 24px;
}
.contact-card {
  display: flex;
  justify-content: space-between;
  background: #f3f4f6;
  border-radius: 8px;
  padding: 10px 16px;
  margin-bottom: 8px;
  box-shadow: var(--shadow-light);
}
.contact-name {
  font-weight: 500;
}
.contact-number {
  color: #6b7280;
}
.add-contact-form {
  background: #f9fafb;
  border-radius: 8px;
  padding: 16px;
  box-shadow: var(--shadow-light);
}
.form-group {
  margin-bottom: 16px;
  display: flex;
  flex-direction: column;
}
.form-group label {
  font-weight: 500;
  margin-bottom: 6px;
}

/* etc. */
Refer back to the gif at the beginning of the guide to see the full design.
Completion & Discussion Checklist
Before joining the group discussion or concluding this tutorial, ensure you have completed the tasks, investigated the bugs, and are ready to discuss the questions below:
Click to expand Completion & Discussion Checklist (9 Items)
| # | Type | Item | Prompt Preview |
|---|---|---|---|
| 1 | Bug Hunt | Response Header Crash (ERR_HTTP_HEADERS_SENT) | If you test this controller with invalid credentials, the server crashes with Cannot set headers after they are sent. Why does Express continue running after calling res.send(), and how does return fix it? |
| 2 | Question | Password Hashing Security | Why do we store a hashed password (passwordHash) in the database instead of the raw plaintext password? What security implications arise if an attacker accesses unhashed passwords? |
| 3 | Question | Asynchronous Controller Error Handling | In asynchronous controller functions (like User.findById()), what happens if a query fails without a try/catch block? How does passing errors to next(err) protect the application? |
| 4 | Question | Input Validation Timing & Cryptographic Cost | Look at the execution order in our register controller: we validate user inputs before calling bcrypt.hash(). What potential server performance, reliability, and security issues could arise if we performed password hashing before verifying input formats? |
| 5 | Question | JWT Expiration Window | What is the purpose of { expiresIn: 60 * 60 }? Why is token expiration set to 1 hour instead of never expiring? What risks exist if an access token has no expiration date? |
| 6 | Question | Token Storage Security (localStorage vs. HttpOnly) | For educational purposes, storing JWTs in localStorage is convenient. In production applications, what security trade-offs (such as XSS vs. CSRF) differentiate storing tokens in localStorage versus HttpOnly cookies? |
| 7 | Task | User Registration Controller | Write the registerController to validate username, email, and password, and hash the password before saving using bcrypt.hash(password, 10). |
| 8 | Task | Frontend Login & State Management | Create function handleLoginBackend that will send the credentials (username and password) to the backend /api/login. If valid, persist the returned JWT within React state. |
| 9 | Task | Client Route Protection Guards | Upgrade App.tsx so that it has three routes: /login, /register, and /home. If a logged-in user accesses / or /login, redirect them to /home using <Navigate replace />. If an unauthenticated user accesses /home, redirect them to /login. |
Conclusion
Congratulations! You’ve built a complete full-stack contact management application with TypeScript, React, and Express. This application demonstrates several important concepts:
- Authentication: Secure login and registration with JWT tokens
- Data Management: Creating and retrieving contacts from a MongoDB database
- Type Safety: Using TypeScript for type checking across the stack
- User Experience: Notifications, form validation, and proper navigation
- Code Organization: Clean separation of concerns with components, hooks, and services
Happy coding!