FocusTube pt. 1 (React Native)
In this project you will learn the basics of React Native and Expo to start building a YouTube wrapper app that will help you focus and not stay distracted.
About the project
Welcome to the React Native FocusTube tutorial! Through this project, you will learn the fundamentals of building mobile apps, making your own API, calling APIs, and using Expo Router.
What you will learn in this Series:
- How to build a mobile app using React Native and Expo.
- How to use and create the fundamental parts of an API (endpoints, requests and responses) inside your Expo app.
- How to connect, fetch, parse, and display API data from YouTube.
- The fundamentals of Expo Router (File-Based Routing, Dynamic Routing, Layouts).
- How to style mobile apps using NativeWind (Tailwind for React Native).
What you will make:
By the end of this series, you will have a basic full-stack YouTube wrapper mobile app that allows you to use YouTube through your own design, such as removing YouTube’s distracting features.
Disclaimer
This series assumes a couple of things:
- You have decent knowledge of JavaScript
- You have basic knowledge of React
- You already have the necessary tools installed (Node.js, an IDE like VS Code)
React vs React Native Patterns
Before we begin coding, it is important to understand the difference between React (for the web) and React Native (for mobile).
- No HTML or DOM: React Native compiles down to actual iOS and Android UI elements, not a web browser. This means you cannot use HTML tags like
<div>,<h1>, or<p>. - Component Translation: Instead of HTML, React Native provides its own primitive components that you must import. You will swap web tags for Native tags like this:
<div>-><View><h1>,<p>-><Text><input>-><TextInput><button>-><Pressable>or<TouchableOpacity>
Setup the project
You will be making your own project instead of forking a repository. Making a React Native app with Expo is incredibly easy!
Open a terminal. In the terminal, go to the folder you want your project to be in, then run this command:
1
npx create-expo-app@latest
You will be prompted to name your project. I named mine my-app.
Next, you will be prompted to select an Expo SDK version (here’s what mine looks like):
Then, you MUST select For learning with Expo Go (SDK 54).
1
2
3
4
Select an Expo SDK version: » - Use arrow-keys. Return to submit.
    Latest (SDK 57)
    For learning with Expo Go (SDK 54)
    Other SDK version…
The setup automatically configures Expo Router, which gives us Next.js style file-based routing out of the box!
cd into that folder:
1
cd my-app
Installing NativeWind
Since we want to use standard TailwindCSS classes (like className="flex flex-col") instead of writing complex StyleSheet objects, we will install NativeWind.
Run this command in your project folder to install NativeWind and its dependencies:
1
2
npm install nativewind@4.2.3 tailwindcss@3.4.19 react-native-css-interop@0.2.3
npx expo install react-native-reanimated babel-preset-expo
Initialize Tailwind:
1
npx tailwindcss init
This creates a tailwind.config.js file. Open it and update the content array to include your app’s files, and add the nativewind preset:
1
2
3
4
5
6
7
8
module.exports = {
  content: ["./app/**/*.{js,jsx,ts,tsx}", "./components/**/*.{js,jsx,ts,tsx}"],
  presets: [require("nativewind/preset")],
  theme: {
    extend: {},
  },
  plugins: [],
}
Next, NativeWind requires a global CSS file. Create a file named global.css in your project root and add this inside:
1
2
3
@tailwind base;
@tailwind components;
@tailwind utilities;
Now, create a metro.config.js file in your root folder and add this code:
1
2
3
4
5
const { getDefaultConfig } = require("expo/metro-config");
const { withNativeWind } = require("nativewind/metro");

const config = getDefaultConfig(__dirname);
module.exports = withNativeWind(config, { input: "./global.css" });
Finally, newer versions of Expo don’t always create a Babel config by default. Create a new file named babel.config.js in the root of your project folder (if it doesn’t already exist) and update it to this:
1
2
3
4
5
6
7
8
9
module.exports = function (api) {
  api.cache(true);
  return {
    presets: [
      ["babel-preset-expo", { jsxImportSource: "nativewind" }],
      "nativewind/babel"
    ]
  };
};
QUESTION: Take a moment to explore what Babel is and how it transforms JavaScript. Understanding Babel will help you grasp the role of the
babel.config.jsfile in this tutorial.
To make sure your app loads this styling globally, go into app/_layout.tsx and add this import to the very top of the file:
1
import "../global.css";
Start the App
Now, run this command to start your development server:
1
npm run start
This will give you a QR code. You can download the Expo Go app on your phone to scan it and view your app live on your physical device, or press i to open it in an iOS Simulator if you have a Mac!
NOTE: When you change your code and save, the Expo Go app will automatically refresh the screen for you. You can also enter ‘r’ into the console.
Now you are ready to start the tutorial! Take a look at your file tree. It should look something like this:
1
2
3
4
5
6
7
8
9
10
11
12
13
14
15
16
17
18
19
20
21
22
23
24
25
26
27
28
29
30
my-app/
├── app/
│   ├── (tabs)/
│   │   ├── _layout.tsx
│   │   ├── explore.tsx
│   │   └── index.tsx
│   ├── _layout.tsx
│   └── modal.tsx
├── assets/
│   └── images/
├── components/
│   └── ...
├── constants/
│   └── ...
├── hooks/
│   └── ...
├── scripts/
│   └── ...
├── .gitignore
├── app.json
├── babel.config.js
├── eslint.config.js
├── expo-env.d.ts
├── global.css
├── metro.config.js
├── nativewind-env.d.ts
├── package-lock.json
├── package.json
├── tailwind.config.js
└── tsconfig.json
Feel free to check out app/(tabs)/index.tsx in your app folder, this is the home screen in your Expo app, which is a good transition into the first topic.
QUESTION: There are some new files in our project. What are
package.jsonandapp.jsonused for in an Expo project?
File-Based Routing
File-Based Routing means that the structure of your files and folders inside the app/ directory automatically defines the screens in your mobile app.
Let’s take a look at what this really means.
In your /app folder create a folder called video. In this folder create a file called index.tsx. In this file, put something really simple like this:
NOTE: In Expo Router, folders wrapped in parentheses like
(tabs)are Route Groups used to organize shared layouts (like tab navigation) without adding the group name to the URL path. Standard folders without parentheses (likevideo) map directly to the URL route (e.g./video). Since we want a standalone/videoroute, we create a normal folder namedvideodirectly insideapp/(outside the(tabs)folder).
1
2
3
4
5
6
7
8
9
import { Text, View } from 'react-native';

export default function Video() {
   return (
     <View className="flex-1 items-center justify-center bg-black">
       <Text className="text-white text-2xl">This is the Video page!</Text>
     </View>
   );
}
Next, how do we see it? In Expo Router, you can navigate by altering the URL or pushing a route. If you are using Expo Go on your phone, you don’t have a URL bar. But don’t worry, we will add navigation buttons shortly!
QUESTION: What is a component? They are key to truly mastering the power of React, so learn a high-level definition to keep in the back of your mind since this term will come up again and again.
Adding more Routes
Now that we know what file-based routing is, make 2 more routes.
/search/playlist
For now, these can display whatever you like.
Here is what your file tree should look like now:
1
2
3
4
5
6
7
8
9
10
11
12
13
14
my-app/
├── app/
│   ├── (tabs)/
│   │   ├── _layout.tsx
│   │   ├── explore.tsx
│   │   └── index.tsx
│   ├── playlist/
│   │   └── index.tsx
│   ├── search/
│   │   └── index.tsx
│   ├── video/
│   │   └── index.tsx
│   ├── _layout.tsx
│   └── modal.tsx
You should have 4 routes in your app: the home screen (index.tsx), /search, /playlist, and /video.
Now that we have a couple routes, we can start to change how they look. Feel free to use the instructions as a guide to your own design, or copy it if you already feel comfortable in React and JS.
The Power of NPM Packages (Video Route)
It is pretty easy to add YouTube videos into your app. If we were building a website, we would just use an HTML <iframe>. However, React Native compiles to actual mobile code, which doesn’t support HTML tags!
Instead of writing complex Native iOS and Android code from scratch to display a video, we can use an NPM Package. Packages are pre-written blocks of code created by the community that we can download and use in our app instantly.
Run this command to install a popular YouTube video package:
1
npm install react-native-youtube-iframe react-native-webview
QUESTION: What are the benefits of using third-party packages instead of writing everything from scratch? Are there any potential downsides?
Now, we can import this package and use it in our /video route:
1
2
3
4
5
6
7
8
9
10
11
12
13
import { View } from 'react-native';
import YoutubePlayer from "react-native-youtube-iframe";

export default function Content() {
 return (
   <View className="flex-1 bg-black justify-center">
     <YoutubePlayer
       play={false}
       videoId={"your-youtube-video-id-here"}
     />
   </View>
 );
}
BUG: In the above answer I purposely omitted one of the required properties of
YoutubePlayer. See if you can spot what is missing or check your terminal logs!
Search Route
Next up, we have our /search route.
NOTE: This may sound counter-intuitive, but the search page will display the search results, not the actual search bar. The search bar will be added on the home page, which we will get to shortly.
First, let’s create a basic page component that just returns a title.
1
2
3
4
5
6
7
8
9
10
import { View, Text } from 'react-native';

export default function SearchPage() {
 return (
   <View className="flex-1 bg-black items-center pt-10">
     <Text className="text-white text-3xl font-bold">Search Results</Text>
     {/* Video cards will go here */}
   </View>
 );
}
QUESTION: This is the second component we have seen. You may start to pick up a pattern on how they are constructed. What do these component functions return?
Next, we need a way to mock a single “Video Card”. A video card should have a thumbnail image, a title, and a description. We also want the entire card to be clickable so it can take the user to the /video route we just made! A perfect job for the Expo <Link> component.
Let’s import <Link> from expo-router and <Image> from react-native, then add a dummy video card:
1
2
3
4
5
6
7
8
9
10
11
12
13
14
15
16
17
18
19
20
21
22
23
24
import { View, Text, Image, Pressable } from 'react-native';
import { Link } from 'expo-router';

export default function SearchPage() {
 return (
   <View className="flex-1 bg-black items-center pt-10 px-4">
     <Text className="text-white text-3xl font-bold mb-6">Search Results</Text>

     <Link href="/video" asChild>
       <Pressable className="w-full bg-neutral-800 rounded-xl p-3 flex-row mb-4">
         <Image
           source=
           className="w-40 h-24 rounded-lg"
         />
         <View className="flex-1 ml-3 justify-start">
           <Text className="text-white text-lg font-bold">How to Learn JavaScript</Text>
           <Text className="text-gray-400 text-sm mt-1">A quick guide to getting started with JavaScript.</Text>
         </View>
       </Pressable>
     </Link>

   </View>
 );
}
Wait, what is a <Link> component? Using this prebuilt component gives us a really cool ability…
QUESTION: Why do we import the
<Link>component instead of just using a standard mobile button?
You can copy and paste the <Link> block multiple times if you want to see what a list of results looks like. Later in the tutorial, we will replace this hardcoded fake data with real API calls!
Playlist Route
TASK: Make the playlist route. It is very similar to the search route. You got this!
- Inside
app/playlist/index.tsx, create a React Native component that shows fake video cards in a playlist. - Style each video as you want using NativeWind classes.
- Make sure each one links to the
/videoroute!
Main and Layout Pages
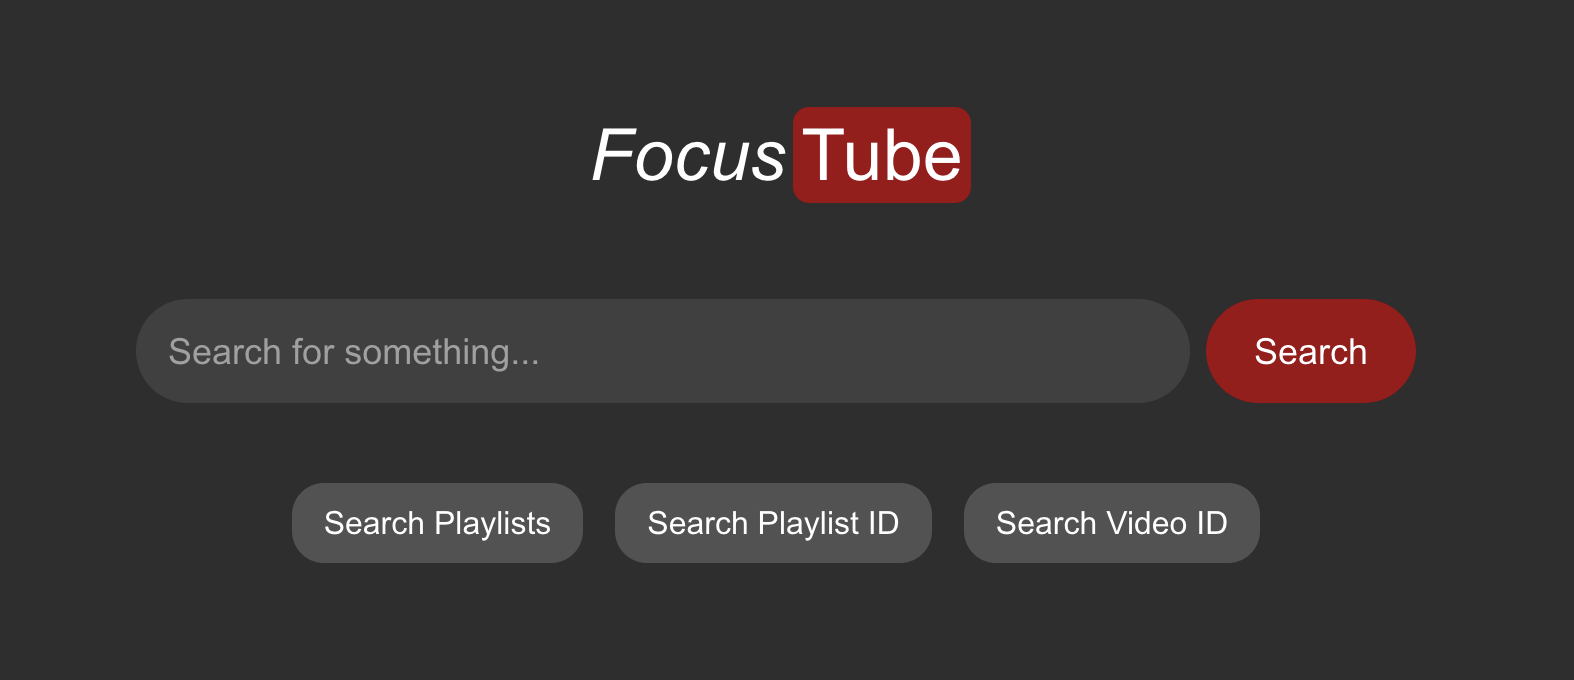
Main Page
Our main page will also be relatively simple. There are just a couple things to implement, all of which you should be able to do on your own. Working code will be included below, but make sure to attempt it yourself first.
What the main page should look like:
- A search input, in which you can type anything
- Searching should not be possible when the input is blank
- 4 different buttons, each leading to 4 different types of searches
- Regular Search Button: A regular video search
- Playlist Search Button: A search for playlists specifically
- Video ID Button: Instead of a search, if you know the video ID, type it here and it will go straight to the video
- Playlist ID Button: Like the video ID button, this will take you directly to the playlist instead of searching for it
Understanding React State (useState)
Before we build the search bar, we need a way to keep track of what the user is typing into it. In React Native, regular variables don’t work for this because updating them doesn’t tell the screen to re-render and show the new text.
Instead, we use a React Hook called useState. It allows us to create a special variable (our state) and a function to update it. When we use the update function, React knows the state has changed and automatically updates our screen to reflect the new data!
Here is how we use it to track a text input in React Native:
1
2
3
4
5
6
7
8
9
10
11
12
13
14
15
import { useState } from 'react';
import { TextInput } from 'react-native';

export default function MyComponent() {
  // We initialize our state variable 'text' to an empty string.
  // 'setText' is the function we will call to update it.
  const [text, setText] = useState("");

  return (
    <TextInput
      value={text}
      onChangeText={(newText) => setText(newText)}
    />
  );
}
QUESTION: In React Native, we use
onChangeTextwhich provides the string directly. How does this differ from the web’sonChangeevent?
QUESTION: Why can’t we just use a standard local variable like
let input = ""to track the user’s input? What doesuseStatedo under the hood when its setter function is called?
Handling Button Clicks and Navigation
To make our navigation buttons work, we will also need the onPress event handler (the React Native equivalent of onClick). Let’s see how that combines with navigation!
Using Expo Router for Navigation
While <Link> is great for simple buttons and images, sometimes you need to navigate to a page after some logic runs—like when a user submits a search!
For programmatic navigation, Expo Router provides the useRouter hook.
1
2
3
4
5
6
7
8
9
10
11
12
13
14
15
16
17
18
19
20
import { useRouter } from 'expo-router';
import { Pressable, Text } from 'react-native';

export default function MyComponent() {
  const router = useRouter();

  const handleAction = () => {
    // Sends you to another route in your app
    router.push('/specified/path');

    // Or go back in your navigation history
    // router.back();
  };

  return (
    <Pressable onPress={handleAction}>
       <Text>Go!</Text>
    </Pressable>
  )
}
Click below to unblur the different parts of the answer
Part 1: State and Navigation Setup First, we need to set up our React state to keep track of what the user types into the search bar. We also initialize useRouter() so we can send the user to different pages when they click the buttons.
1
2
3
4
5
6
7
8
9
10
11
12
13
14
15
import React, { useState } from "react";
import { View, Text, TextInput, Pressable } from 'react-native';
import { useRouter } from "expo-router";

export default function Home() {
 const [input, changeInput] = useState("");
 const router = useRouter();

 const handleSubmit = () => {
   if (input.trim() !== "") {
     router.push(`/search/${input}`);
   }
 };

 // ... return statement below ...
Part 2: The Search Input Next, we build the search input. We tie the <TextInput> value to our state, and when the user submits their keyboard (triggering onSubmitEditing), we use router.push() to navigate to the search results!
Please don’t skip through without giving it a solid attempt :)
1
2
3
4
5
6
7
8
9
10
11
12
13
14
15
16
17
18
19
20
21
22
23
24
25
 // ... inside Home() return statement ...
 return (
   <View className="flex-1 bg-black items-center pt-20 px-4">
     <View className="mb-10 items-center">
       <Text className="text-white text-5xl font-bold">Focus</Text>
       <Text className="text-red-600 text-5xl font-bold">Tube</Text>
     </View>

     <View className="w-full flex-row items-center mb-6">
         <TextInput
           className="flex-1 bg-neutral-800 text-white p-4 rounded-l-lg text-lg"
           value={input}
           onChangeText={changeInput}
           placeholder="Search for something..."
           placeholderTextColor="#888"
           onSubmitEditing={handleSubmit}
         />
         <Pressable
           className="bg-red-600 p-4 rounded-r-lg"
           onPress={handleSubmit}
         >
           <Text className="text-white font-bold text-lg">Search</Text>
         </Pressable>
     </View>
     {/* ... navigation buttons below ... */}
Part 3: The Navigation Buttons Finally, we add our quick-navigation buttons. Since these don’t require submitting the keyboard, we can just use simple onPress events to check if the input is empty, and if not, route the user to the correct page.
1
2
3
4
5
6
7
8
9
10
11
12
13
14
15
16
17
18
19
20
21
22
23
24
25
26
27
28
29
30
31
32
33
34
35
36
37
38
39
40
41
     {/* ... inside Home() return statement ... */}
     <View className="w-full flex-row flex-wrap justify-between">
       <Pressable
         className="bg-neutral-800 p-3 rounded-lg w-[48%] mb-4 items-center"
         onPress={() => {
           if (input.trim() !== "") router.push(`/search/${input}`);
         }}
       >
         <Text className="text-white font-semibold">Regular Search</Text>
       </Pressable>

       <Pressable
         className="bg-neutral-800 p-3 rounded-lg w-[48%] mb-4 items-center"
         onPress={() => {
           if (input.trim() !== "") router.push(`/playlist-search/${input}`);
         }}
       >
         <Text className="text-white font-semibold">Search Playlists</Text>
       </Pressable>

       <Pressable
         className="bg-neutral-800 p-3 rounded-lg w-[48%] mb-4 items-center"
         onPress={() => {
           if (input.trim() !== "") router.push(`/playlist/${input}`);
         }}
       >
         <Text className="text-white font-semibold">Search Playlist ID</Text>
       </Pressable>

       <Pressable
         className="bg-neutral-800 p-3 rounded-lg w-full items-center"
         onPress={() => {
           if (input.trim() !== "") router.push(`/video/${input}`);
         }}
       >
         <Text className="text-white font-semibold">Search Video ID</Text>
       </Pressable>
     </View>
   </View>
 );
}
Layout Page (_layout.tsx)
This page is unique in Expo Router, but is also very powerful.
The layout page is the UI that is shared between routes.
In Expo Router, this file is called _layout.tsx. No matter where you are in the app, what is in the layout page wraps your current screen.
This often includes:
- Any global providers you want to add
- Headers and/or footers
- A Bottom Tab Navigation bar or Drawer Navigation
Feel free to make your Layout page your own. Luckily, Expo already has a really useful one made for you that you can tweak!
TailwindCSS via NativeWind
This portion is optional because I want this tutorial to focus more on APIs and React Native. However, if you are interested in learning more about TailwindCSS, you can try it out on this project! TailwindCSS has shown to be a very powerful library especially when it comes to AI.
Because we installed NativeWind during setup, you can use regular Tailwind classes on your Native components.
TailwindCSS is a different way of doing CSS. There are no StyleSheet objects; instead, you add classes for each style you want.
For example, in regular React Native, you may make a StyleSheet and add it like this:
1
2
3
4
5
6
7
8
9
10
11
12
13
import { StyleSheet, View, Text } from 'react-native';

const styles = StyleSheet.create({
   centerView: {
     flex: 1,
     justifyContent: 'center',
     alignItems: 'center'
   }
});

export default function MyComponent() {
  return <View style={styles.centerView}> <Text>Hello World</Text> </View>
}
In TailwindCSS, each one of these attributes is its own class that we can add straight to the component. For example:
1
2
3
4
5
import { View, Text } from 'react-native';

export default function MyComponent() {
  return <View className="flex-1 justify-center items-center"> <Text>Hello!</Text> </View>
}
For a deeper dive, I highly suggest Fireship’s 100-second video on TailwindCSS.
Dynamic Routing
For many mobile apps, it is impossible to hardcode every single screen. This is one such case, as it needs to be able to render any video on YouTube.
Luckily, Expo Router has a pretty simple way to make the screen differ based on the parameters passed in the route. It’s called Dynamic Routing.
Here is an example:
I have this route in my app:
app/video/index.tsx
Currently, this is kind of useless because there is only one video. However, with dynamic routing, we can insert the Video ID into the route to affect the screen.
In order to implement this, you will need to rename your route file to use brackets. It should look like this:
app/video/[videoId].tsx
Expo Router knows you have a dynamic route when the file or folder name has brackets around them.
QUESTION: Why does the filename use brackets
[videoId]? In a dynamic route, if a user navigates to/video/abc, what will the value of the parameter be?
Pay attention to what you name the file inside the brackets. That is what we will need to call in the next section.
Where we need Dynamic Routing
We need dynamic routing pretty much anywhere the screen is impacted by parameters, which happens to be all of our routes in this case.
So, you should:
- Rename your route files to use brackets (/search, /video, /playlist)
- Name your files whatever you want, they just have to be in brackets to work:
[name].tsx
Your file tree should now look like this:
1
2
3
4
5
6
7
8
9
10
11
12
13
14
my-app/
├── app/
│   ├── (tabs)/
│   │   ├── _layout.tsx
│   │   ├── explore.tsx
│   │   └── index.tsx
│   ├── playlist/
│   │   └── [playlistId].tsx
│   ├── search/
│   │   └── [searchId].tsx
│   ├── video/
│   │   └── [videoId].tsx
│   ├── _layout.tsx
│   └── modal.tsx
Now navigate to each route by pushing /route/[anything you want here] (e.g. /video/dQw4w9WgXcQ)
Also, notice if you try to navigate to just /video, it won’t load the content page anymore. This is because index.tsx was renamed into the dynamic route [videoId].tsx, so a static /video route can no longer be found.
Using Params
The biggest reason why we use these dynamic routes is it makes it easy to pass information to the screen via the route URL.
In order to do so, we use the useLocalSearchParams hook from Expo Router.
useLocalSearchParamsis a React Hook that returns an object containing the dynamic route parameters.
1
2
3
4
5
6
7
8
9
10
11
12
13
14
import { useLocalSearchParams } from 'expo-router';
import { Text, View } from 'react-native';

export default function Route() {
   // Destructure the parameter name you chose for your file.
   // If your file is [videoId].tsx, you destructure 'videoId'.
   const { videoId } = useLocalSearchParams();

   return (
     <View className="flex-1 bg-black justify-center items-center">
       <Text className="text-white"> This is a Route containing Video ID: {videoId} </Text>
     </View>
   );
}
Implementing Dynamic Route Parameters
Since all of our routes are dynamic, in every route, call useLocalSearchParams() and integrate it in some way to your component, even if it’s just displaying the search term or playlist ID on screen.
Challenge Task
Make the parameter in app/video/[videoId].tsx determine the video ID that plays in your YouTube Player!
HINT: Look at how the
<YoutubePlayer>component takes itsvideoIdproperty.
React vs. React Native: Routing & Renders
If you have built websites using React or NextJS, you might be wondering about some of the differences:
- No SSR (Server Side Rendering): In NextJS, components run on the server by default. React Native runs entirely on the client device. There is no server rendering, which means we do not need to write
'use client'at the top of our files! - Unified Hooks: Since everything is on the client, you can use React hooks like
useStateanduseEffectanywhere in your application without restrictions or special compiler flags. useLocalSearchParamsvsuseParams: NextJS usesuseParamsfromnext/navigationto read route params. Expo Router usesuseLocalSearchParamsto read route parameters on mobile devices.
Loading State
When loading data in a mobile app, it is important to give the user visual feedback so they know the app hasn’t crashed.
While NextJS has a special loading.js file convention for server-side loading boundaries, React Native apps typically handle loading state using standard React useState variables and Native loading indicators like the <ActivityIndicator> component from react-native.
Here is an example of how you can implement a loading screen in React Native:
1
2
3
4
5
6
7
8
9
10
11
12
13
14
15
16
17
18
19
20
21
import React, { useState } from 'react';
import { ActivityIndicator, View, Text } from 'react-native';

export default function LoadingExample() {
  const [isLoading, setIsLoading] = useState(true);

  if (isLoading) {
    return (
      <View className="flex-1 bg-black justify-center items-center">
        <ActivityIndicator size="large" color="#ef4444" />
        <Text className="text-white mt-4">Loading content...</Text>
      </View>
    );
  }

  return (
    <View className="flex-1 bg-black justify-center items-center">
      <Text className="text-white">Content loaded!</Text>
    </View>
  );
}
That is all for this section of the tutorial!
In Part 2, we will dive into data fetching, calling actual APIs, and populating our video cards with real YouTube videos!
If you made it this far, thank you and I hope this tutorial has helped you get a decent start with React Native and Expo!